Code Generation Task Configurator
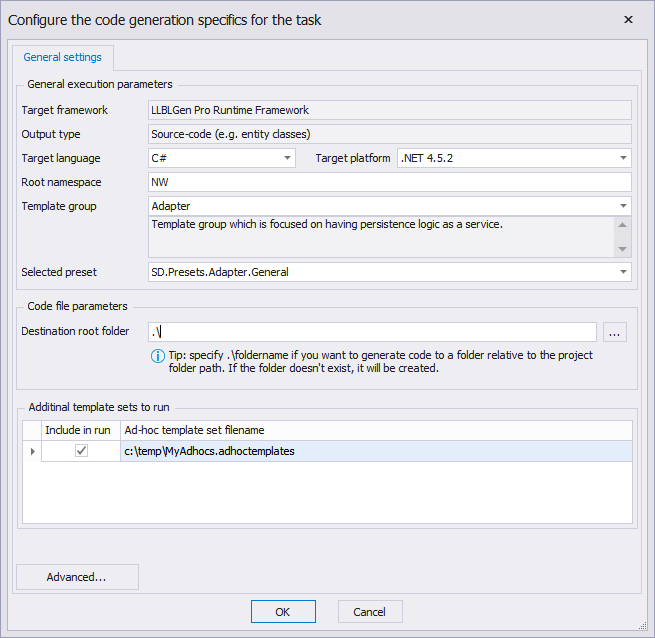
The Code Generation Task Configurator lets you configure a code generation task and consists of two tabs, the General Settings tab and the Template Bindings tab, which is shown only when the Advanced button is clicked.

The Code Generation Task Configurator
General Settings
The General settings tab is the tab where you start with when configuring the code generation process. It contains various parameters for the code generation process which allow you to setup and start the code generation process.
Start by selecting the Target language you want to use. This is the language the generated code will be in. The next step will be to select which Target platform you are generating code for. Make sure you select the right platform, as it influences the templates available to you.
After you've made the selection for the target platform, specify the
Root namespace in the root namespace textbox. This root namespace
textbox is filled with the root namespace defined in the Project Settings. Say, you've defined it as
SD.Northwind, then the namespaces in the generated code all start with
SD.Northwind, so the namespaces in the code will look like
SD.Northwind.CollectionClasses or SD.Northwind.Entities.
When the root namespace has been defined, select the template group you want to use for your generated code. A template group is the grouping construct of a set of templates. It depends on the project's target framework which template groups are available.
After the template group has been chosen, select one of the available presets. A preset, is a definition of a run queue, with tasks and task groups in the right order, with the right values for the task parameters. The available presets are documented in detail in the manual for the target framework chosen.
The generated code has to be stored in a directory, and you can define
that directory in the Destination root folder textbox. You can
specify a relative path from the location the project file was loaded
from. E.g. you have a folder called MyBigProject and in that
folder you've defined two folders: LLBLGenProProject and VS.NETProject,
the LLBLGen Pro project file is located in the LLBLGenProProject folder.
To generate code in the VS.NETProject folder, simply specify
..\VS.NETProject as the Destination root folder. Paths starting with
..\ or .\ are recognized as relative paths.
If you have any adhoctemplates files in Templates folders, the designer will find them when you load the project and will enlist them in a list with checkboxes on the General Settings tab. If you want to run any of these templates with your code generation run, check the checkbox in front of the file and the templates included in the adhoctemplates files checked are executed during the code generation run.
The General Settings tab is enough to specify the information needed to start a code generation process.
Template bindings tab
The Template bindings tab is the tab where you define the precedence of the template bindings to use. This tab is only visible when Advanced... is clicked on the General Settings tab. LLBLGen Pro uses template files which are bound to a TemplateID. These bindings are defined in so called template bindings files. On the Template bindings tab you'll see all found template bindings files and their contained TemplateID - template file bindings for the target platform you've chosen on the General settings tab. The template bindings files are sorted on precedence, the one with the highest precedence is located at the top.
There can be more than one template bindings file which binds a file to the same TemplateID. When a task refers to a given TemplateID, LLBLGen Pro starts looking for a template binding with that TemplateID in the template bindings files in scope (the ones you see on the Template Bindings Tab), starting at the top.
To let the code generator choose for a given TemplateID a particular template file, make sure the template binding for that TemplateID is above all other bindings to that same TemplateID. This mechanism lets you easily override the shipped templates by creating a new template bindings file, bind your own custom template to the same TemplateID you want to override and then place the template bindings file above the template bindings file which contains the binding you want to override.
You can change the precedence of a template bindings file by selecting it and then by clicking the move up/down buttons at the right of the list. The order in which the templatebindings are placed at the time the code generation is started is preserved in the project file.
Be aware that by changing the .NET version it will reset the template bindings ordering changes you've made to the default, which means all template bindings files are sorted based on their precedence value defined in the file.