Project Validation
LLBLGen Pro contains a deep, multi-stage project validation system. In
the following sections, the various stages are explained as well as the UI
elements you can use to solve errors and warnings.
Validation stages
The following validation stages are performed in LLBLGen Pro:
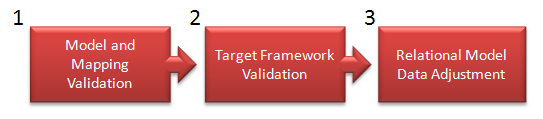
The project validation stages
If each stage is completed successfully (i.e. no error was detected), and
if ordered to do so, the validation moves to the next stage. The stages are
described below
- Model and Mapping Validation. This is the first stage and
this validation makes sure that every element in the model is valid by
itself and that every element in the model has a valid mapping. If an
error is detected in one of the elements in the model or in the
mappings, it is send to the UI as an error and the validation stage
won't proceed to the next stage. No target framework specific validation
is performed, nor any relational model adjustment is done.
- Target Framework Validation. When the Model and Mapping
Validation stage doesn't throw any error, the Framework Validator
assembly of the target framework is invoked to validate the project.
Each target framework has its own Framework Validator assembly, and
these assemblies are in charge to cache any feature / project element
which isn't supported by the chosen target Framework.
- Relational Model Data Adjustment. This stage is the final
stage of the validation process and alters the relational model data
elements to match them with the model elements mapped onto them. This
stage adds PK constraints, FK constraints, Unique constraints, marks
fields as removed etc. etc. This stage is only started if it's
explicitly ordered to do so (see below) and the Target Framework
Validation stage didn't throw any error. After this stage the relational
model is completely in sync with the valid entity model.
Stage execution
Not every stage is executed every time. The following list shows when
which stages are executed. Stage 1 and 2 are always executed together.
Execution of stage 1 & 2
The following events trigger the execution of validation phases 1 and 2:
- Selecting 'Validate' from the Project menu in the main menu
- Selecting 'Validate' from the toolbar
- Selecting 'Validate' from the context menu when right-clicking the
Project node in Project Explorer.
Execution of stage 1, 2 and 3 together as 1 process
The following events trigger the execution of the complete set of
validation stages from start to finish:
- Selecting 'Validate and Adjust Relational Model Data' from the
Project menu in the main menu
- Selecting 'Validate and Adjust Relational Model Data' from the toolbar
- Selecting 'Validate and Adjust Relational Model Data' from the context menu when right-clicking
the Project node in Project Explorer.
- Starting a code generation process by pressing F7 or selecting
'Generate sourcecode' from the Project menu in the main menu.
- Starting a refresh of Relational Model Data, by selecting 'Refresh
Relational Model Data from a Database' from the context menu on a
Relational Model Data storage container in the
Project Explorer or
Catalog Explorer
 Important Important |
Before you generate a Database Schema Create script or a
Database Schema Update script, it's highly recommended you do
a full validation using all three stages, to make sure the
relational model data reflects your model. Do this by selecting
'Validate and Adjust Relational Model Data' from the Project menu in
the main menu. |
Displaying Errors and Resolving them
When an error or warning is detected by one of the validation stages, it
throws it upwards, and it ends up in the Error List, which is a pane
docked at the bottom of the LLBLGen Pro designer. The error or warning is
also logged as text in the Application Output pane which is also
docked at the bottom of the LLBLGen Pro designer.
LLBLGen Pro tries to attach to each warning or error one or more
suggestions or actions. You can view the suggestions or actions for each
error by expanding the error in the Error List pane. If the error or warning
has one or more suggestions, they describe what you can do to solve the
error. If the error or warning has one or more action choices you can take,
each of them will contain a link you can click to either go to the
particular editor and load the element and correct the error manually, or if
applicable, you can click the link to correct the error directly. It depends
on the error which corrections/actions are given.