Designer - GUI elements
The Gui Elements Explained
The LLBLGen Pro designer is a true .NET application, which can run by itself: it doesn't have to be hosted in an
IDE. The designer consists of various different elements which are described briefly below. The complete GUI is
made context aware and is direct, which means that when you change anything and there is no 'Cancel' button, the
change is made directly. The complete GUI is then kept in sync: changing a name of an entity will propagate
that change to all other GUI elements which show that name.

The LLBLGen Pro Designer
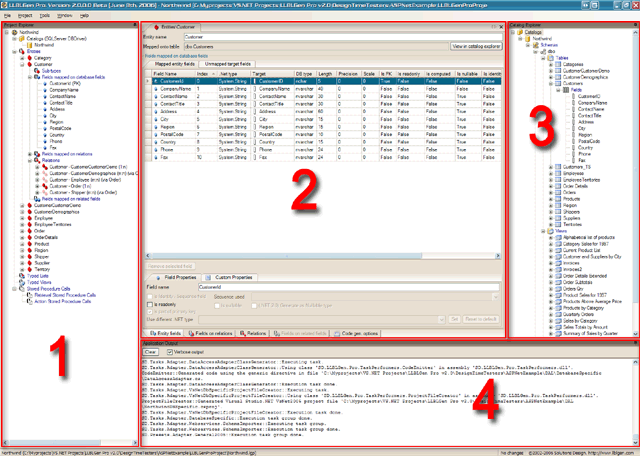
In the picture above four main areas are marked. These areas are explained below. Besides these areas, the GUI
contains a menu bar with options you can execute and a status bar, which shows you information about the current
project. The menu at the top shows general options, it doesn't contain element specific menu options. These are
shown in context menus when you click with the right mouse button (RMB) on an element in, for example, the
project explorer.
The areas 1, 3 and 4 can be dragged around in the GUI, they're fully dockable. The GUI preserves the layout during sessions: the next time you
run LLBLGen Pro, the areas are located at the same location as when you closed the application the last time. When you run LLBLGen Pro for the first time,
it will put the areas on their default position and you can then re-position them inside the designer.
- Project explorer. When a project is loaded, it is visualized in the project explorer. It allows
you to browse the complete project, all elements in the project and, via context menus which can be visualized
by clicking on various elements using the RMB, you can add new elements, open editors or sort lists of elements.
The project explorer can be docked to all sides of the designer window and can be slid to the side of the window by
unpinning the window.
The project explorer has a checkbox at the top which allows you to show or hide elements which are marked as hidden. Elements which are marked as hidden could be relations and fields mapped onto relations. If you don't want elements of these types which are marked as hidden to clutter your project explorer, uncheck this checkbox.
- Tab area. In this area, all editors are opened as well as some detail windows used by the Catalog explorer
or for example the entity overview list.
You can browse through the tabs via Ctrl+TAB and Ctrl+Shift+TAB, or via the Windows menu. To close tabs, use the close button at the
top right of the tab area or use Ctrl+F4. The tab-area is single-row, with the VS.NET 2003 tab scroll buttons at the top right. Some editors opened in this
area have tabs themselves, as shown in the screenshot above. These sub tabs are located at the bottom of the tab.
- Catalog Explorer. This window lets you browse the complete schema set included in the project. When you
create a project, the complete schema set targeted by the project is embedded in the project itself, so you
don't need a connection with the database. You can use the catalog explorer to see every element in the schema set
loaded. When you click on an element, the catalog detail viewer is opened in the tab area showing the details about
the element you selected. The catalog explorer has a viewing function mostly, however it allows you to change a few elements, like renaming
a schema and changing the amount of resultsets returned by a stored procedure. Access these functionalities by selecting and clicking these
elements with the right mouse button to open the context menu of that particular element.
- Application Output. This window is used by several components in the designer to list output to the user.
It has a checkbox for Verbose output or not, a setting which can be controlled via a setting in the application preferences.
It's best to minimize this window away at the bottom by clicking its pin button to unpin it, which is the default position.


